Do NOT Enter!
It's not that long ago that I spent more time in the garage, or shed, than the house itself. Why? Because sometimes you have to be at one with your project. People all too often get in the way; chatting at you idly, words just floating past as you try to concentrate on the next job. There's something about the inner peace I get from being alone in my favourite environment.
As a kid, mates used to congregate at our garage because I was always busy working/playing on something, from pushbikes to 'crossers, sometimes even Dad's '61 Triumph. That was me, it was where I learnt the hard way about taking things apart, and trying to put them back together. And things didn't exactly change as I got older.
I could stand for hours staring at my bikes, literally in freezing conditions. I didn't care - a thick padded shirt on top of my overalls, a fresh brew and I was set for the evening. Procrastinating, problem solving, admiring and so on. To the outsider this maybe viewed as weird and boring, but to the enthusiast (ooh that sounds lame) it's a reason for living.
So should we feel bad about this need for alone time, being at one with machinery? No way! We only pass this way once and it should be enjoyed as much as is humanly possible. If that involves deep thought about the next repair, ride or restoration, then think away.
Friday, February 26, 2010
Tuesday, February 23, 2010
Parts Cleaning with Vinegar - it ain't just for chips!
Cleaning ya bits.
So what do you reckon? I'd heard about the wonders of using vinegar on rusted parts to bring them back up like the proverbial shiny pin. Had to be worth a try, vinegar is as cheap as chips (doh) and the parts could be cleaning themselves while I carry on with more pressing tasks.
So, couple of bottles of Black and Gold white vinegar later, I had a small acid bath in action.
One rusty bolt
I'll check again in a week.
One snag I have come across today when I walked past - saw some fizzing going on in the vinegar and thought "Great, it's doing the job!"
In with the long nosed pliers to grab whatever it was that was fizzing to find the rear brake adjusting nut as clean as a whistle. Unfortunately, it was aluminium and half the size it should have been! It was literally crumbling in my hands! Yes, vinegar is far too strong for alluminium parts so from now on, we'll stick with steel!
A Scotch in the hand is worth a bike in the bush.
Creepie Crawlies.
It seems that precautions are needed when restoring anything that's been lying around in Australia for a few years. So far I've come across spiders, woodlice, some sort of centipede and, worst of all, ants. Now, I'm none too fond of ants and, to be fair, they were none too impressed at being poked around by me when the stripdown commenced - but they had to go!
The handlebars and the front hub were absolutely full of the little buggers and I'm seriously hoping I've seen the last of them.
Now back to the project.
The corrosion does look quite severe but I'm hoping there are some good bits left underneath.
The air filter (long since disintegrated) complete with nest of some description.
The ants were calm at this point. It was when I tried to remove the anchor plate that they went nuts!
The linings had plenty of life left in them - shame they were no longer attached to the shoes! And yes, the hub was full of ant eggs.
She's wearing the wrong mudguard and the seat is a little dilapidated but this just adds to the fun of restoration.
When you begin the stripdown, always label everything and put it away in boxes. I'm not too concerned this time because I'm familiar with Can-am's but, had it been another make, I'd be labelling it all. Photos also help with the obscure parts.
Tuesday, February 16, 2010
Restoration project: I have one!
We've got a live one here!
It ain't pretty, and there's a lot of work to do, but what an awesome project if I can pull it off!
From what I can gather, it hasn't been run for the last fifteen odd years, and spent around ten of those sat by a pool, three sat on this fence post, with scarecrow aboard, and the last two lying on the ground after it fell off the fence post!
I was in two minds about taking it, but it's a Bombardier Can-am T'n'T 175 and, being as I've owned a few 250's, couldn't miss the chance of taking on another. Besides, I hate to see anything rotting away. That's the boot of Doug the dummy and yes, it looked like a dead body!
So Angus, the present owner, fetched the Bobcat and lifted her over the fence so we could have a proper look and I became the proud owner of yet another Bombardier. For the princely sum of a bottle of Scotch. Does it get any better than that?
So what can I tell you about it? This particular bike was made in 1975 by Bombardier. Known for making planes, trains, snowmobiles etc., their off-road motorcycles were called Can-am's. This is a T'n'T 175 (short for track and trail). Powered by a Rotax 2-stroke, disc valve engine with the obvious capacity of 175 cc.
There's a lot missing and a lot that may need to be thrown away. Is it worth restoring? Probably not, but restoration shouldn't be about the money - more the enjoyment of problem solving and the pride you get with the finished article. I wanted to showcase a restoration - showing what could be achieved and, although this could be pushing the boundaries somewhat, will try to do a good job. Wish me luck.
We lay it in the back of the Falcon and took it home. Dave, who actually found it for me, was a legend! We unloaded and quick as a flash he was there, hosing the bike down, then trying to get the seat and tank back on. He was as excited as I was to see what it would look like. Even Gaby said she liked it but I'm not sure I believe her as yet.
This is Queensland, Australia and the wildlife wasn't too impressed with the move! Huge spiders living aboard suddenly decided to hop off and make tracks but the ants nest in the front drum still seems to be going strong!
All in all a great weekend and I got what I wanted. Hopefully Angus is as pleased with the Scotch as I am with the bike.
The clean-up operation will commence soon! (I promise.)
Saturday, February 6, 2010
Tools of our Trade - Hammers.
My favourite part of restoration - filling the shed with tools!
What are you going to require? Does it need to be expensive? Is there a limit to how many toold you need?
To start with - yes you'll certainly need to be armed with more than a wooden spoon and a Swiss army knife. The better equipped your toolbox - the easier life is going to be.
Let's start with the basics.
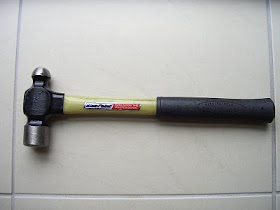
That's the hammer.
The toolbox favourite! Used correctly - one of the most useful tools in the inventory. However, when used by an idiot - and you will see evidence of this during a restoration - the resulting carnage can end up haunting you forever more.
Pick a 2lb ball pein hammer to start with. Ideal for most jobs and, as a back-up if the work gets heavier, a small lump or club hammer should get you through most situations.
Sometimes, a steel hammer can be too harsh. For instance, you don't want to mushroom-over a shaft or spindle. In these cases, the copper mallet is ideal. The copper bears the brunt of the force, leaving the harder steel part in perfect shape. The weight of it still enables you to shift seized components but without the damage a steel hammer can do.
Then comes the rubber mallet. Laugh you may, but if you want the cooling fins on a stubborn cylinder head or barrel to stay intact, you'll need a rubber mallet to avoid any damage (although a good block of wood will sometimes suffice). Although difficult to break things with a rubber hammer, it isn't impossible, so be careful with those fins!
Don't forget that we no longer have the common sense we were born with so make sure you wear eye protection when using any of the above.