Wednesday, June 23, 2010

Satin or gloss black?

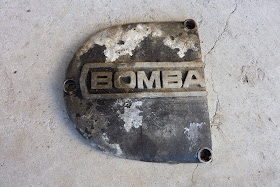
When painting the Can-am engines I normally go for satin black.  To take a quick break from the engine internals, I thought I'd clean up the oil pump cover and give it a quick coat to see what gloss looked like.  Gloss is fine as long there are few imperfections in the surface but, because of the corrosion, I might not get away with it.

Hope there's metal under that corrosion.


Oof! Needs a bit of a clean up!  So a quick wire brush and I was left with this.


Time to get the rough wet and dry out.  I used an 80 grit to get rid of the worst of the corrosion and start feathering the paint edges.


Corrosion evident on the outside too.  Oh well, it'll add to the aged look! 

Time for the 320 wet and dry.  Looks like I'll end up with bare metal so 320 will be near to finish on.  If flatting off a painted surface, you need to end up with 800 grit to avoid the scratches showing through the paint.


Time to degrease and lay on the paint.  I did the underside and let it dry before turning it over and painting the side that matters.  My favourite aerosol engine paint is PJ1 Fast Black.  It goes on thick and the finish is superb.  I'm using Septone engine enamel but it does take a little more effort to cover compared to PJ1.


Unsure as yet whether or not I like it.  Might flat it off and use satin black instead. 
Decisions decisions.

Tuesday, June 22, 2010

Engine strip... yet more.

The clutch is off, the kickstart ratchet and idler gear exposed... so let's delve deeper.


The emulsified oil left in the gearbox has actually kept the internals fairly well protected.  Nothing horrendous as yet.

The kickstart stop screw can be seen poking through here.  It has a 17mm hexagon head and does look like a sump plug from underneath.  If you undo it to drain the oil, the kickstart ratchet is immediately released!  Always remember to undo the Allen bolt sump plug when changing the oil.


That leaves us with the disc valve cover.  The little plastic gear (oil pump drive) in the centre of the crank unscrews by hand.  Then it's time for the air gun to remove the crank nut and gear.

The disc cover is held by four screws, but take a little care when removing because they are always very tight.  An impact screwdriver is probably the best way to remove these after so long.


One disc valve.  The rusty stains actually wiped off with a rag and WD40!  The crankcase surface the valve runs on is in excellent shape too.  Just a little light pitting, and for Magnesium cases, that's pretty good.

.

Thursday, June 17, 2010

Engine strip continued.

Time for the clutch.  This is a slightly different setup compared to the average Japanese bike.  Normally the pressure plate can be removed and the plates taken out but on the Rotax engine, the aluminium hub needs to removed too.
First remove the six screws from the pressure plate.

Now remove the plate and the springs behind it.

This leaves the centre nut and its tab washer.  Hit the tab back with a chisel and a hammer and remove the nut.  You'll need a clutch locking tool to lock the hub and clutch basket together unless you have access to an air gun.  Luckily I have an air gun!

Now the centre hub can be lifted out.


The plates can now be pulled out together.  Just as well because these are stuck together.

The clutch basket can now be removed, taking care with the order of the bearings, shims/spacers etc. on the gearbox shaft.  Refit them into the basket in the correct order and put a zip tie around to keep them in place.  If the engine is apart for several months, you'll be glad you did.

One clutch removed.  Next we'll get the kickstart ratchet, idler gear and disc valve cover out.

Tuesday, June 15, 2010

Engine strip time!

I was going to leave it until the frame had been painted but couldn't resist a little peek inside.


As you can imagine, some of the Allen bolts were tight/corroded and were difficult to get moving.  When undoing any Allen bolts, make sure any crud is removed from the socket head and that the Allen key fits properly.  The Allen key/driver must bottom out in the fastener or it will slip and it's all too easy to round off the inside, then be left with drilling the head off - a pain anyone can do without.


The first surprise -  no oil pump!  Plenty of corrosion though.


Time for some warmth.  Magnesium cases so plenty of care too.  It's surprising how gentle heating can free up the bolts.


And considering the water content, not in bad fettle.  The oil pump drive on the inside of the cover would have been getting a hard time without the oil pump to hold it in line.  In fairness, I'm impressed so far.