Tuesday, January 1, 2013

Suzuki GSX750 ESD - Front Brake Caliper Rebuild.

Brake Servicing
Before you consider the need to upgrade your existing braking system, is it actually working as the manufacturer intended?

Calipers are often overlooked if they're not leaking, but dirt build-up and corrosion will stop the piston sliding freely. When the piston can't move back and forth easily, not only is it harder to apply braking force, but it will also prevent the brakes from releasing too. They'll run hotter which could mean warped discs and/or brake fluid boiling. 
If the caliper looks dirty, corroded or the pistons are hard to push back, it's time for a clean up and maybe new seals. The calipers on the GSX are way past a simple clean. It's time for major surgery so, once painted, it's time for the new seals and piston...

Caliper Pistons and Seals


Wednesday, December 26, 2012

If There's Any Doubt, There Is No Doubt. "Ronin"

Great film, and that line makes perfect sense.
It's a restoration. The idea is to use as many of the original parts as possible. You clean, repair and do what you need to make them good again. That's what it's all about.

But this is Brakes!

If you're at all worried about the condition of your brake lines, fit new. Don't hope for the best. I'm going to clean the GSX hoses up and see how they look. They're old and, once fitted to the bike, will be checked under pressure. Any bulges or leaks and they're heading for the bin, but for now we work with what we've got.


Saturday, December 15, 2012

GSX750 ES Rear Caliper and Master Cylinder Rebuild.

New Parts Have Arrived!
The caliper is still waiting patiently for its new rubbers and pistons. It's ages since I painted it so even I'd forgotten how well they'd come up.

Suzuki GSX Rear Caliper Rebuild Kit.
First step was to make sure there was nothing stuck in any of the holes - slight discolouration of the drillings isn't the end of the world, and with a quick wipe it was time to fit the seals. Always check that the seals you fit don't have a taper - sometimes they need to be fitted a certain way.

Wednesday, November 14, 2012

Wemoto.com - Just Brilliant!

Less than a week of ordering
And I have a well-wrapped parcel of '83 GSX750 bits. A week might not be quick to someone living in the UK or US, but living out here in Oz that's pretty damn good. And they're based in Britain!

World's End Motorcycles supply parts for all bikes including the ones fast turning into "classics". Holding the hard to get stuff that keeps you mobile, such as brake caliper and master cylinder repair kits, fork stanchions through to gasket sets, camchains, sprockets and... it goes on. Their easy to use website lets you choose between pattern and genuine parts too.

So when your local bike shop isn't interested in something over ten years old, and you need parts quickly, but you don't want to pay the earth for them, try www.wemoto.com  

(Quick post, but needed mentioning.)

Thursday, October 11, 2012

Can Someone Invent Me A Spray?

To clean the crud out of fins... and leave them black and shiny.
The engine is usually the most favoured of the restoration process. It's the bit that does the most, it's the life of bike - well it's just more exciting than the rest!

But I've been putting this off. The old GSX has had a hard life and hasn't seen much in the way of cleaning. Hence the ant's nests in the cooling fins, coupled with years of oil build-up and finished off with what looks like a couple of laps on a motocross track. Yeah, it's a mess.


Ok, a steam cleaner/jet wash might have got a fair bit of it out, but that wasn't possible at the time. So, we're back to manual cleaning of the motor.

The tools.
Toothbrush, Scotch pads, WD40, petrol, carb cleaner, screwdrivers and other metal-pokey-stick things. And a compressor. Strewth, sounds really professional. Oh well.

First thing's first, cover all ports and oil holes with rags etc. to keep the debris out of the important bits. I want to try and keep this engine in one piece, only to remove covers for repair and inspection.

Digging the major stuff out with a screwdriver and then blowing it clear with an airline can get you to a stage where you can use a toothbrush or Scotch pad in the gaps. It's slow, messy work but with plenty of solvent, the oil soon starts to break down. And a compressor and air jet makes it easy to blow out the crap from the crevices. Job's a job as they say... somewhere... probably.


Right hand side took a hit. Not yet removed the cover...

Bolts wrapped with masking tape filling the oil cooler feed/return holes.

Slow work, but a definite improvement.


Camchain tensioner hiding beneath thirty years of grime.
Various nests litter the fins. Would have been nice and warm!

Bodgett and Scarper let loose with hammer and chisel.

We're starting to see an improvement. Doing as much as you can with a Scotch pad is good because it'll also key any paint surface, preparing it for another coat if needed. I'm not going to go too mad on the finish because this motor may still have to be stripped. I'll just have to wait and see.


Banjo bolts? Or banjo players?
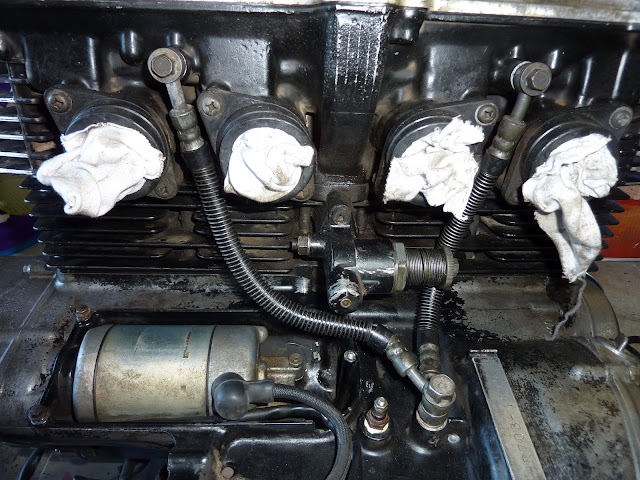
A brilliant invention, the humble banjo bolt allows you to secure pipes where a liquid, or gas, has to pass through. Now, care must be taken not to over-tighten them (because there's a bloody hole right through the middle of them), but the biggest issue with them is allowing the pipe to twist when the friction of the bolt head is too great. Like in the picture below.

See the angle of the oil lines? You see this a lot, whether metal lines or rubber. When tightening a banjo bolt, either insert a screwdriver by the side of the pipe to stop it turning with the bolt, or turn the pipe back slightly so when the bolt is torqued the pipe moves to the correct angle. 

In the picture below you can see both pipes hard against the inlet rubbers and the left one almost kinked at the bottom. Not good.


That's more like it.


So, a little more progress in the garage, and a pleasant surprise to see the starter nice and clean under its cover. A few more hours should have the engine looking reasonable.
At this point I think a wire brush in a drill over the crankcases to give the brushed alloy look, leave the barrels and head in black and polish the outer covers and rocker cover. Yes, I know the ignition cover looks like it's been attacked with an angle grinder! Bear with me.


Sunday, September 2, 2012

Queensland Raceway - What to expect on your first track day.

Biggest fear?
I've been talking about it for years, but still hadn't done one. Why? Simple. Breaking my bike. 
Yeah, I didn't want to drop it and write it off, and I know the road is a dangerous place, but you tend to ride within a different set of parameters, known limits. On the track anything goes, go as fast as you can and try to keep it upright. Harder than it sounds.

But...
Then Will, of Billeigh Photography fame, tells me he's doing a track day with Champion's ride days on his new FZ8. This sparked a new interest. And another mates too apparently, because then Dave also took his R6 up to the QLD raceway for a day's thrash. So it was time to bite the bullet.

$190 later and booked in with Dave, who was keen to do it again already, for the Saturday. There's a choice of groups with red for beginners, green for slow intermediate, blue for fast intermediate, and yellow for FAST baby!

At Dave's advice I took green. His first track day was in red, but being able to overtake a fair few riders, chose to move up a level. Good advice.


Sunday, August 12, 2012

Well, The Rolling Stones Said...

"Paint It Black."
The components are taking shape. The smaller parts are getting a lick of satin black, while the wheels have been treated to a high gloss. If I'm honest, when it comes to colour, I'm going on gut feeling, and what shapes me everytime I'm treated to a new cafe racer/custom on the internet.
Who knows what it will look like when finished - and who cares? That's one of the things I like about rebuilds, personality. It's what you do, because you can.

Enough drivel, what's been going on this week? 

I needed to get the brake discs looking better, or newer. I cleaned off the old paint, rubbed them down and masked the bits that do the stopping. In case you were wondering, the centres of the discs are sprayed with heatproof engine paint because the normal stuff just won't hack it. If you want to spruce the braking surface, use a block and rough emery cloth. These came up pretty good in fairness - rolling stoppies coming up.


GSX750ES Brake Discs


They came up like bloody new (near as dammit).

And now the wheels.