The Intricate bits.
Fiddly, corroded, delicate, but pretty simple to bring up as good as new. Having temporarily misplaced the lefthand switch, I set into its better half.
Apart from the throttle tube, the righthand side contains the light, starter and kill switches, and all were working ok previously. The red plastic of the kill switch has, unfortunately, faded to pink, so I've decided to paint it in satin black to keep it low key. The lettering will also be left in black (at this stage) because I don't want to draw attention to it. Of course, I may change my mind on this later on. But, without further ado, here's what it looked like.
Showing posts with label GSX750. Show all posts
Showing posts with label GSX750. Show all posts
Sunday, April 6, 2014
Saturday, November 16, 2013
eBay Search Hits The Spot Again!
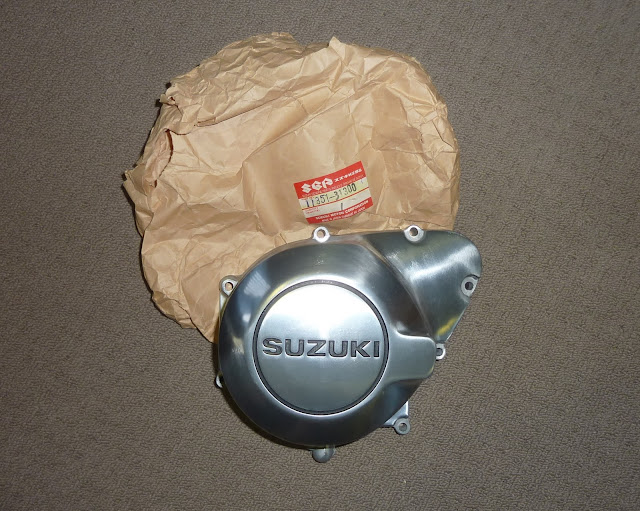
Search: 11351-31300
Bought a project? Do yourself a favour and make a list of the items you'll definitely need to finish it off. Go to an online parts website and use their microfiche facility to work out the exact part numbers you need and, finally, save your search on eBay.
As the months go by, it's surprising what pops up for sale. I've now picked up a new stator cover for the GSX. That's both front crankcase covers sorted now which is going to finish the engine off nicely.
A big thanks to mcpartssales for packing and sending it so quickly. Great service and proof that those hard to find bits are still hidden away in shops everywhere. If you're looking for anything for your project, give Rod a shout at his eBay store. He's been in the bike trade for over thirty years and is absolutely passionate about finding the elusive bits we all need every now and again. Thanks again mate!
Saturday, January 12, 2013
NOS - New Old Stock (Not Nitrous)
Trawling eBay for "NOS"
Don't you just love it, mooching through the pages of NOS stuff on eBay and you find the exact part number you need?
Thirty years on and someone had old 61211-31310 sat amongst their old spares. Unused and on the other side of the world just waiting for the GSX to be brought back into contention.
So, bought and sent from the UK, I now have something to hold the swing arm in the bike. Job jobbed.
And on another note...
Managed to find a company in the UK selling aftermarket brake caliper slide pin rubbers for the GSX. Mine had expanded far beyond useful and I needed new ones to keep the grease in, and the crap out.
Motorcycle Products Ltd. have a massive selection of bike parts and I got 5 rubber boots for fifteen quid. Not bad, it was nearly ten bucks per boot from Suzuki and, as I only needed four, was left with a spare just in case.
So the front calipers are now finished. Another tick in another box. Slide pins move nicely, new pistons, seals and brake pads. Check out these before and after pics.
Thursday, October 11, 2012
Can Someone Invent Me A Spray?
To clean the crud out of fins... and leave them black and shiny.
The engine is usually the most favoured of the restoration process. It's the bit that does the most, it's the life of bike - well it's just more exciting than the rest!
But I've been putting this off. The old GSX has had a hard life and hasn't seen much in the way of cleaning. Hence the ant's nests in the cooling fins, coupled with years of oil build-up and finished off with what looks like a couple of laps on a motocross track. Yeah, it's a mess.
Ok, a steam cleaner/jet wash might have got a fair bit of it out, but that wasn't possible at the time. So, we're back to manual cleaning of the motor.
The tools.
Toothbrush, Scotch pads, WD40, petrol, carb cleaner, screwdrivers and other metal-pokey-stick things. And a compressor. Strewth, sounds really professional. Oh well.
First thing's first, cover all ports and oil holes with rags etc. to keep the debris out of the important bits. I want to try and keep this engine in one piece, only to remove covers for repair and inspection.
Digging the major stuff out with a screwdriver and then blowing it clear with an airline can get you to a stage where you can use a toothbrush or Scotch pad in the gaps. It's slow, messy work but with plenty of solvent, the oil soon starts to break down. And a compressor and air jet makes it easy to blow out the crap from the crevices. Job's a job as they say... somewhere... probably.
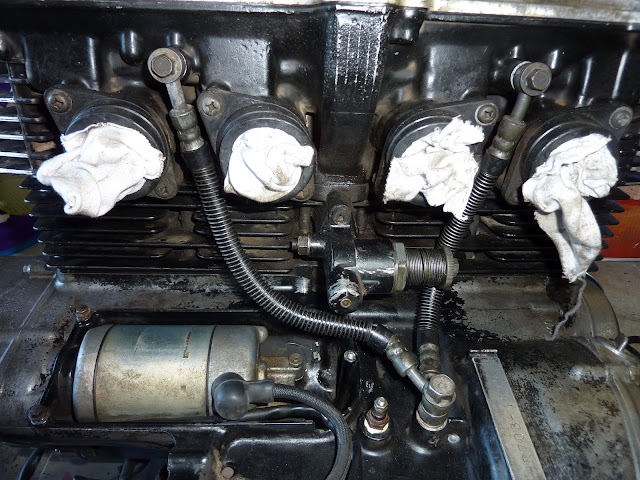
See the angle of the oil lines? You see this a lot, whether metal lines or rubber. When tightening a banjo bolt, either insert a screwdriver by the side of the pipe to stop it turning with the bolt, or turn the pipe back slightly so when the bolt is torqued the pipe moves to the correct angle.
In the picture below you can see both pipes hard against the inlet rubbers and the left one almost kinked at the bottom. Not good.
The engine is usually the most favoured of the restoration process. It's the bit that does the most, it's the life of bike - well it's just more exciting than the rest!
But I've been putting this off. The old GSX has had a hard life and hasn't seen much in the way of cleaning. Hence the ant's nests in the cooling fins, coupled with years of oil build-up and finished off with what looks like a couple of laps on a motocross track. Yeah, it's a mess.
Ok, a steam cleaner/jet wash might have got a fair bit of it out, but that wasn't possible at the time. So, we're back to manual cleaning of the motor.
The tools.
Toothbrush, Scotch pads, WD40, petrol, carb cleaner, screwdrivers and other metal-pokey-stick things. And a compressor. Strewth, sounds really professional. Oh well.
First thing's first, cover all ports and oil holes with rags etc. to keep the debris out of the important bits. I want to try and keep this engine in one piece, only to remove covers for repair and inspection.
Digging the major stuff out with a screwdriver and then blowing it clear with an airline can get you to a stage where you can use a toothbrush or Scotch pad in the gaps. It's slow, messy work but with plenty of solvent, the oil soon starts to break down. And a compressor and air jet makes it easy to blow out the crap from the crevices. Job's a job as they say... somewhere... probably.
 |
| Right hand side took a hit. Not yet removed the cover... |
 |
| Bolts wrapped with masking tape filling the oil cooler feed/return holes. |
 |
| Slow work, but a definite improvement. |
 |
| Camchain tensioner hiding beneath thirty years of grime. |
 |
| Various nests litter the fins. Would have been nice and warm! |
 |
| Bodgett and Scarper let loose with hammer and chisel. |
We're starting to see an improvement. Doing as much as you can with a Scotch pad is good because it'll also key any paint surface, preparing it for another coat if needed. I'm not going to go too mad on the finish because this motor may still have to be stripped. I'll just have to wait and see.
Banjo bolts? Or banjo players?
A brilliant invention, the humble banjo bolt allows you to secure pipes where a liquid, or gas, has to pass through. Now, care must be taken not to over-tighten them (because there's a bloody hole right through the middle of them), but the biggest issue with them is allowing the pipe to twist when the friction of the bolt head is too great. Like in the picture below.
See the angle of the oil lines? You see this a lot, whether metal lines or rubber. When tightening a banjo bolt, either insert a screwdriver by the side of the pipe to stop it turning with the bolt, or turn the pipe back slightly so when the bolt is torqued the pipe moves to the correct angle.
In the picture below you can see both pipes hard against the inlet rubbers and the left one almost kinked at the bottom. Not good.
That's more like it.
So, a little more progress in the garage, and a pleasant surprise to see the starter nice and clean under its cover. A few more hours should have the engine looking reasonable.
At this point I think a wire brush in a drill over the crankcases to give the brushed alloy look, leave the barrels and head in black and polish the outer covers and rocker cover. Yes, I know the ignition cover looks like it's been attacked with an angle grinder! Bear with me.
Subscribe to:
Comments (Atom)


