Thursday, March 1, 2012

Harley Electrics Causing Grief? Don't Blow a Fuse, Help is at Hand!

Don't you just love the internet?
I was just pointed in the direction of a fantastic help manual/pdf concerning Harley Davidson wiring diagrams - and it deserves a repost.


Rewiring a bike can be a pain in the proverbial, and finding a fault somewhere within even harder at times! So, thanks to John Siebenthale, here's a handy link to his FREE pdf designed to make H-D wiring easy easier.


http://www.siebenthalercreative.com/pages/how-to/HD-wiring.html

Sunday, February 26, 2012

Bike Designated Parking at Laurel Cottage, Lower Beechmont, QLD

Laurel Cottage's Motorbike Parking


At the top of one of the best biking roads on the Gold Coast, QLD is a cracking cafe that now has a section devoted to motorcycle parking. Lower Beechmont is a small village just 15 minutes from Nerang (turn off the Nerang-Murwillumbah Road), and each weekend the incredible, winding road is packed with all kinds of cruisers, supermoto's, sports bikes and classics.


Mike and Karen Beer, owners of Laurel Cottage Cafe and Restaurant, have now made a small section outside especially for motorbike parking - how welcoming is that? Now you can have a brew while your pride and joy sits safely just metres from your table.


So, when you're looking for the ideal spot for breakfast or lunch, and want to ride one of the best roads out there, plan a ride through Lower Beechmont soon. The coffee is great, the food fantastic and the prices perfect - highly recommended! You'll find them on Facebook here.


How to get there
From Nerang, head out on the Nerang-Murwillumbah Road and take a right onto the Beechmont Road. You can't miss this junction, you'll see the first couple of bends and a broad smile will appear on your face. Ride for about 7km's through beautiful forest and you'll be in Lower Beechmont. Continue past North Road (great lookout area just up there, and to the left) and, after about 500m, on the left hand side you'll see the sign for the cafe. Open on Thursdays thru to Sunday evening with an impressive menu.


For a great ride and unbelievable views, incorporating part of The Scenic Rim, carry on through to Beechmont and down to Canungra for the chance to try out the "Goat Track" which takes you up to North Tamborine. Tight hairpins all the way up! Take a camera, there's lots you'll want to remember.


See you there soon.

Saturday, February 25, 2012

How To Polish Your Bike's Bolts - Seriously.

While I wait on the suspension to come back for the Gixer, I thought it might be a good time to start cleaning up a few of the bits and pieces that hold her together.


Fairing bolts always make a bike look tatty when they corrode, or go dull, so I thought I'd give them the treatment. This is one of the front mudguard bolts. Doesn't look too bad in the photo, but could be improved.


All you need is an electric drill, emery cloth (for the roughest of bolts), 400/600 grit wet & dry, a scotch pad and good old Autosol. (Be careful with the drill - I don't want to hear about rags being ripped up in the chuck, or losing fingers whilst holding a bit of emery cloth against a spinning bolt.)


How To Polish Bolt Heads Up Like New.


Fit the bolt into the chuck of the drill. No need to go too tight - we don't want to damage the threads. If the bolt is pretty clean and not too corroded, a scotchbrite pad will be enough at this stage to clean up the head. Spin the drill while holding pressure on the head of the bolt with the scotch pad. Be careful because it will get warm after a while.


If badly pitted, bring it back to a smooth finish using emery cloth first, then followed with fine wet & dry. The finer you go, the better the results, but I only went to 400 grit. It leaves the tiniest of lines, but you can't see those unless you're using a magnifying glass.


Once you're happy, get a rag and apply a small dab of Autosol - again use the drill to polish the head.


They should start to look a little like the one on the right.


The polished mudguard bolts in front, and a dull fairing bolt behind.


It's possible to apply the technique to any bolt, but you'll never get the hexagon section perfect with this method. Still, a vast improvement on what they were!


From one side of the bike. 3 x fairing bolts, 3 x mudguard bolts, 2 x caliper bolts and 2 x wheel spindle pinch bolts. Not too shabby.


Don't Forget, You Can Polish ANY Bolt!
To prove this works on any old bolt, here's a rusty 8x1.25 I had sitting on the bench. The raised letters and numbers still clearly visible.


Rough emery cloth will take most stuff off. You'll probably need to hold the emery cloth as well as support the drill, but you'll soon get the hang of it.


It's working, just needs a little more. Once the head is smooth all over, start with the 400 grit.


A light going over with the finer grade just leaves fine lines.


A quick dab of polish and we've got a great shine!


If I was fussy, I could continue with the wet & dry until all imperfections were gone, but you'll never see those when they're fitted to the bike.


Remember, these surfaces will go dull, and steel will rust eventually. Keep an eye on them and give them another going over every now and again. In the UK, where salt is applied to the roads every winter, it's hard to keep fasteners clean even with regular washing. But even plated bolts suffer there. 


This is a cheap fix that probably anyone can do with a little time. Not only does it improve the bike's looks, it'll add value if you're trying to sell it.


Tuesday, February 7, 2012

DRZ 400E Supermoto - Tyre Choice.

Dunlop Arrowmax's - slipperier than an oil-soaked banana!

When I bought the DRZ it came fitted with brand new Arrowmax's, so I never really knew any different. It was always really twitchy - enough to put people off riding it in fact, but the lack of grip was becoming a real concern. Mates were riding WR450's and 450 EXC's, with decent rubber underneath, and to stay in front with a lack of power and poor grip was pretty difficult to say the least.

Cornering hard always made the little 400 step out at the rear (this could be quite amusing unless trying to make progress), and the front would protest at the slightest hint of a stoppie but, being tight, I battled on until they were worn out. I must just add that although the grip was extremely poor in the dry, in the wet it was horrendous! Has anybody actually bought these out of choice?

Sizes fitted at this point were a 140/70-17 on the back, and a 120/70-17 on the front. So what next?

Well a search on eBay came up with a place in Australia selling a pair of Pilot Powers for $302 delivered - bargain! It was time to take the rear up to a 150/60-17, and retain the 120/70-17 on the front because I didn't want it to be any more twitchy that it already was.

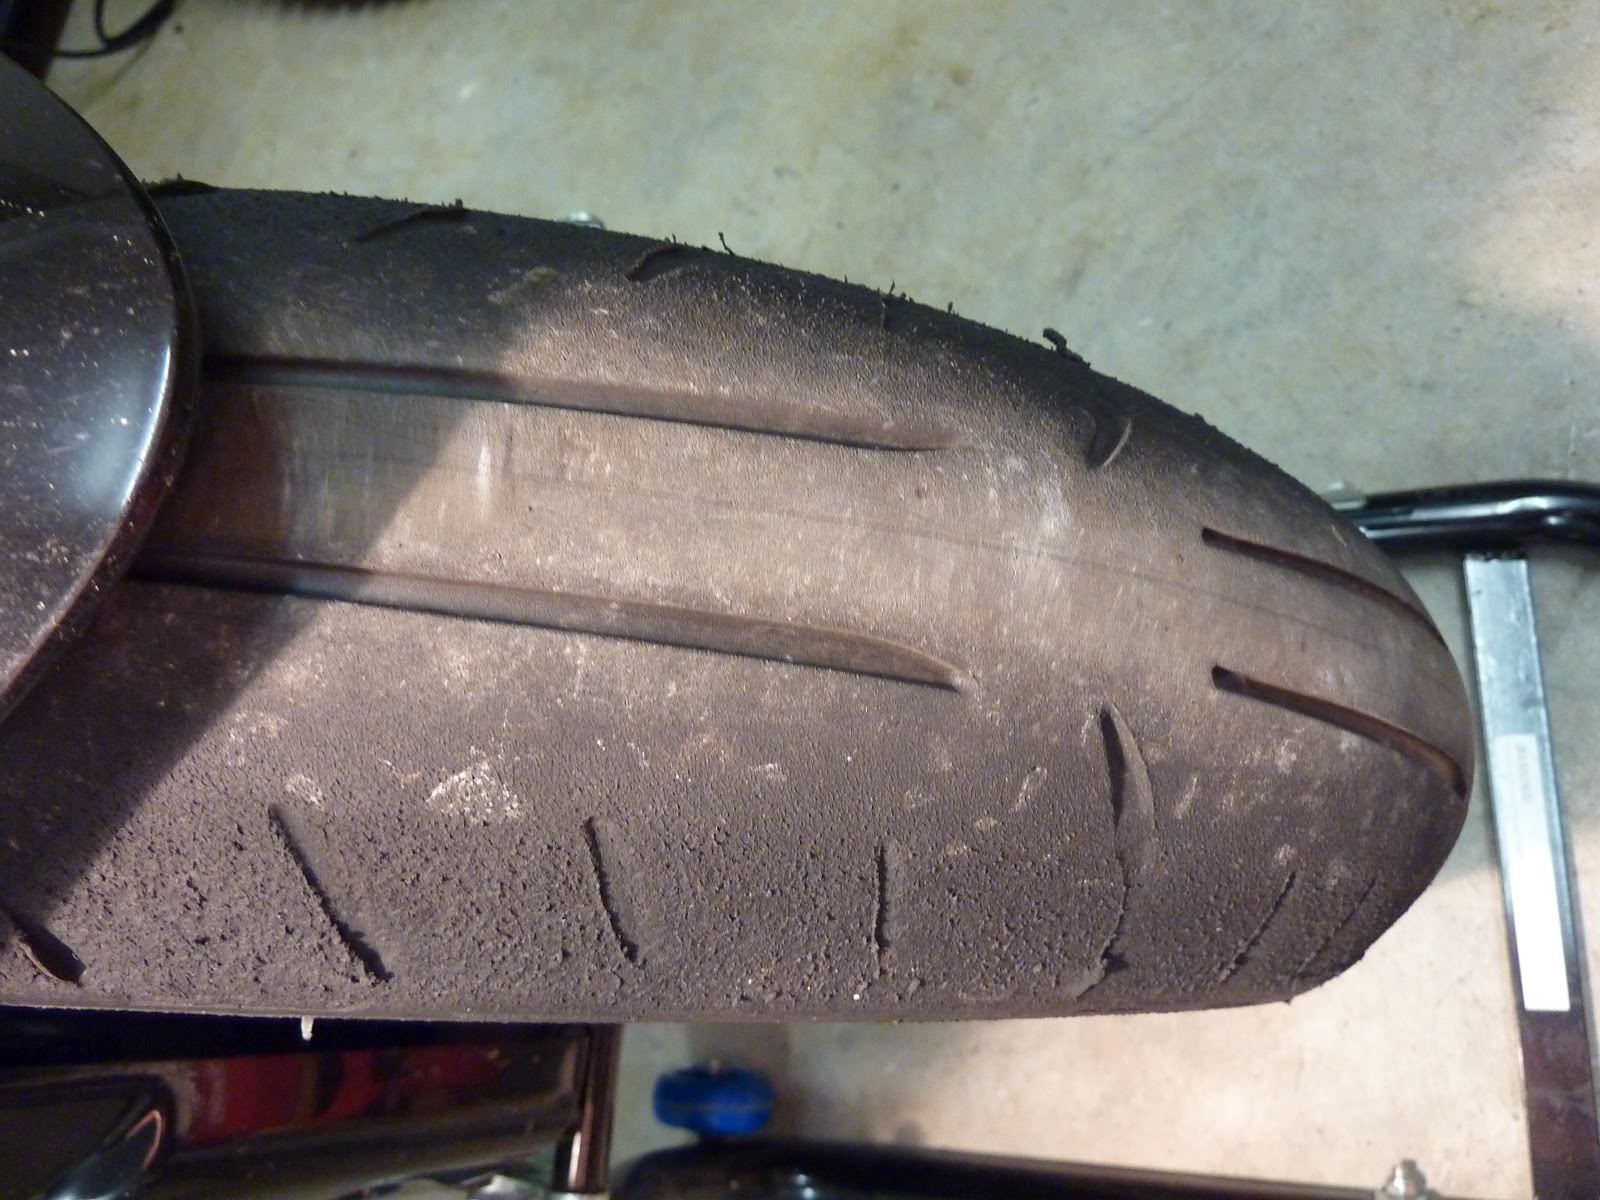
Michelin Pilot Powers - grip[pier] than a glue-soaked grippy thing!

The service from Kelly's Rubber was exceptional and the tyres turned up in less than a week. So a couple of hours later and they were fitted. Time to ride and try them out. 


WOW!

I've never felt such a difference from just fitting a couple of tyres. It's transformed the whole bike! 

It feels much more mellow, nowhere near as twitchy and just grips and grips! I tried everything on a few local hairpins to make it step out, and only once did it bite me in the ass because i was leant over too far! Awesome doesn't describe how good this bike is right now!

Power can be applied really early in a corner and even Dave, who swears by his WR, actually likes to ride it now. In fact I'd say he's quicker on it than the WR! So far I'm running at around 32psi and it feels great. I've heard a lot of supermoto riders use 29psi so I might have a play around with pressures - then again, if it ain't broke.

The best bit? Rolling stoppies are now easy enough because it actually grips! Should've bought them years ago.

GSXR 1000 K5/K6 Tyres - What do you use?

Can you outperform your tyres?


Having used Pilot Sports, Pilot Powers, then Power Pures, I was more than happy with the performance of Michelin tyres. Now I wanted to try another of their brand - the Pilot Road 3.


Why?


Two reasons: more mileage, and the need to see if a touring style tyre could do the same as the sports tyres in the real world. I see so many bikes parked up on the weekend with the latest soft rubber on, and the edges all balled up, only to wonder. 


"Are these geezers actually fast, or do the tyres just inflate their ego?" Inflate - get it? Pfft.


I loved the Power Pures, but they don't last forever and the front was starting to move around when leant right over, and the rear would occasionally light up if a little too enthusiastic out of a bend.


They wore well, actually taking the sides out before the centres. Not a bad looking tyre either, still prefer the old Pilot Sport tread pattern though. 


But then to choose these? On a Gixer? Have I gone nuts?


Time will tell. There are already some signs of uneven wear on them, but this is probably due to the worn shock and undamped forks. I'm hoping the revalved suspension components will soon start to clean up the tread to give me a clean, round (not stepped) profile.


Revalved suspension? 


What's this I hear you say? Let's just say I had a great chat with Mr Peter Clements of ProMechA. I have a feeling he's going to cure the Gixer's handling woes.

GSXR 1000 K5/K6 Suspension - Swingarm and Shock

Boing Boing Boing!


Although there wasn't much wrong with the rear of the bike, apart from the tired shock absorber, I wanted to replace any worn needle roller bearings in the swingarm and linkages. While the swingarm was out, I could also repaint it because of a few scratches.

With the bearings all ordered, replacement was pretty straightforward. I replaced the two main swingarm bearings too because I could feel the tiniest amount of play in there. This was exactly the same afterwards though, so I guess a tiny bit is normal.


Bearings were removed with hammer and punch when necessary, and using sockets with 12mm threaded bar. They were all pulled back in with the threaded bar, sockets and large washers. Here's the finished linkage.


Scratches were flatted out with 400 then 800 grit paper and etch primer applied to the bare aluminium. Next it was primed, and finally painted with satin black. It came out well considering the chain was still wrapped around it!


The shock, although in need of a freshen up, was going back in. Maybe a rebuild in the future.


A lack of pics doesn't help, but the job was relatively simple and the swingarm pivot tool is definitely needed to avoid damage to the swingarm spindle nut.

GSXR1000 K5/K6 Suspension - The Forks

This is where the fun started.

All I wanted to do was chuck another couple of seals in (not that they were leaking), and change the oil. A cartridge revalve, and maybe even a spring change would have been nice, but costs needed to be kept down so I decided to keep it basic.

Some form of spring compressor is needed to disassemble them properly so it was out with the welder to knock up a quick tool. It ain't pretty, but it works. The bolts, filed down to 8mm on the ends, screw into locating holes on the plastic tube above the fork spring allowing you to push down and compress the spring to allow access to the locking nut below the fork top. 

At least that's the idea. It's useful if you're generously proportioned too because those springs take some compressing! In the end I reverted to two ratchet straps around the tool and then around the wheel spindle reinserted in the bottom of the fork leg. This works a treat, but it's still a two man job.


The following picture will give you an idea of the assembled unit within the fork leg itself. This is what you'll get if you just remove the 8mm Allen bolt from the bottom of the fork leg instead of removing spring first. You can see the cartridge, the spring, the plastic tube and the fork top nut complete with rebound and preload adjuster.


Unfortunately, once engrossed in the forks, the pics stopped, but here's a brief description of reassembly. 

I'd already bought new fork seals off eBay (43x55x9.5/10.5), but as Davey always says "The poor man pays twice" and, sure enough, they were useless... but I was yet to find that out. 

So, cartridge refitted (spring must be removed beforehand), fork tubes together and now we just needed to fill with oil and bleed the damper assembly. This involves filling the fork with the correct grade of oil - don't just risk a "5W" hydraulic oil, this was also my undoing... but I was yet to find this out too. Buy a well known, or recommended, fork oil from a motorcycle dealer because every make of oil and grade has a different viscosity even if it says 5W on the bottle. Another lesson learned.

Around 600ml of oil is poured in, and then you can bleed the damper. The damper rod must be pulled up and pushed back down several times steadily until the resistance is the same all the way through the stroke. There are fork bleed tools you can buy to make this easy. My advice is to leave the fork for ten minutes at this point and then retry to allow any bubbles/cavitation to disperse. 

Now you can set your fork oil height. Check manufacturers recommended heights and ensure the outer leg is as far down as possible. Hold the fork upright and check how far down the oil is. A plastic tube zip tied to a piece of welding rod and a syringe is the ideal way to remove the right amount of oil. Just mark the welding rod at the right height, insert it into the fork leg and suck out excess oil. All good? Cool, time for the spring.

Refit spring, washer and plastic tube. Compress spring, pull damper rod back up through (another piece of welding wire) and fit the special plate (in the pic) above the spring and under the locking nut to hold down the spring while you refit the fork top nut (don't forget to refit the rebound adjusting rod). 


On the GSXR, the lock nut must be exactly 11mm from the top of the damper rod before tightening the fork top nut assembly; this allows for the correct amount of rebound adjustment.

Now the plate can be taken out, the spring compressor removed and finally the top nut can be screwed back into the fork leg. Reset your preload, compression and rebound screws to standard positions, or to your own preferred settings if you'd already experimented previously, and refit in the bike.

So what went wrong???

Where do I start? Well the bike was sat on the stand for about a week while I was carrying out work to the rear suspension when the right fork began to leak! DOH! 
By now the bike was almost back together so I decided to give it a shakedown run first before stripping the fork again. By the time I got back, the leg leg had started leaking - not impressed.

Forks back out, seals obtained from a dealer (not genuine, but Japanese made and a better feeling material), filled with oil, bled again - back in bike. No leaks, but not impressed with feel from front end. Doesn't appear to be any rebound or compression adjustment, bike reacts like a pogo stick. You can still make progress, but the front feels likes it's losing grip when leant over at high speed.

Forks back out to check lock nut adjustment (11mm remember?). All good, and oil height ok. Refit into bike, but no matter what I do to the adjustment, I can't improve the comfort and the bars are hammering my hands on every ride! So at this point I'm considering a different grade of oil, but the more I read about the K5/K6 Gixer, the more I understand that the forks are a weak point unless revalved... interesting. 

Time to give ProMechA a ring.