Showing posts with label GSXR. Show all posts

Tuesday, January 4, 2022

Yamaha R1 Streetfighter - Wiring To The Finish!

 Tidying up the wiring...

So far, the most painful part while knocking up the streetfighter has been the wiring or, more importantly, where to hide it. While also making it look tidy and functional. Where the manufacturers have loads of room within a fairing to put everything neatly, we need to move it somewhere else.

Traditionally, the headlamp shell would hold a fair section of wiring, but my LED light is pretty chunky and I'm guessing it's going to run quite hot with the huge heatsink on the back of it - I'll keep an eye on that.

There seems to be a fair bit of room under the airbox (above the engine) so I'm putting what I can in there. I'm also moving two relays under the seat along with the fusebox, purely for ease of access. The fan relay can stay under the airbox. I'll keep the headlamp fairing loom intact with all plugs so it can be put back to standard at a later date.


Wednesday, November 17, 2021

Yamaha R1 Streetfighter - Repairing Bodywork

 The Tailpiece...

Finding a secondhand tail for the R1 was becoming a pain. Cheap enough in the States, rocking horse shit out in Oz. I decided to give repairing it a go. It was cracked in several places, missing a chunk of plastic just under the seat, and both mounting brackets were broken off and missing. Not a good start, but not impossible.

I'm not a huge fan of plastic welding on fairings — I haven't come across a really strong weld yet — but am open to it if someone can prove the join is stronger than the original section. I am going to superglue the cracks shut, then fibreglass behind them. Yes, fibreglass is messy, but extremely strong and durable. With a light skim of filler, I'm hoping to get away with it.

The pointy bit under the seat will have to built up first in fibreglass, then shaped with filler. I consider this to be skill-building, and I need the practise with filler anyway.


Thursday, March 3, 2016

Queensland Raceway with Champions Ride Days — 28/2/2016

Hot day at QR.
Considering I wasn't that bothered in going to this one, and only made my mind up at 4.00am on the day, it was a cracker! Good old Bry picked me up and we stopped for the obligatory Wild Bean coffee on the way. All signed in and even scrutineered before 7.30, much to the dismay of one of the guys checking the bikes. Never mind, a bit of cheek from Bryan about doing some work soon had him smiling, or grimacing — it's a wonder it passed! 
Will and Leigh, of Billeigh Photography, were already here and set up with a table, chairs and various other luxuries. It seemed rude not to make use of the facilities.

The car crew were all out on track doing laps and then... well, looking under bonnets. I took some pics of the bikes in the meantime while we waited for Dave to arrive.


Wednesday, October 28, 2015

Biketech7 and Champions Ride Days - QR 24/10/2015

Never a bad day!
Last time I was at Queensland Raceway I came off at turn four, but even that day turned out pretty good in the end. That was over a year ago. Today there were three of us heading up, plus Will on photography duties, and we were all in blue. We were there at 7.00am so had plenty of time to sign on, get the bikes sorted and kit up. Briefing was quick, and soon enough yellow group were out on a fast one.

There was some nice stuff up here today, and not many bikes make a 1290 Superduke look boring, but in our very own group of blue there was this Kawasaki H2R. More on this later.


Monday, November 10, 2014

Biketech7 - GSXR1000 Fuel Pumps And Filters.

Progress is made...
With the genuine fuel filter, and other bits, quickly delivered from International Moto Parts, and the aftermarket pump from Axiom Performance, I was ready to get back some of the lost power.
So, tank up and fuel line disconnected, I thought I'd try another fuel flow test. No fuel runs out of the tank at all when I disconnect the pipe - which isn't right, it should flow out under gravity. This time, instead of connecting up a separate loom to the pump wiring, I'm just going to turn the ignition on and let the bike run its own priming cycle. That way I can compare fuel amounts before the work, and after. 


Thursday, June 5, 2014

Biketech7 - Track Days, Warming Tyres and Oops!

Champions Ride Days, Queensland Raceway - 31/05/2014.
With the bikes loaded up on the Friday afternoon, we were set to leave at 6.00am on the Saturday. Leathers, helmets, boots, food and a few tools for good measure, and straight up to the Coomera BP garage for a brew and meet the others. By 7.30am we were rolling into the massive complex that is QR to find a load of cars racing round the track, and a dose of bikes already unloaded.
Over to the control tower to get registered and we were soon ready for scrutineering and the rider's brief. The weather was perfect, not too hot and just slight cloud in the sky. 


Sunday, May 4, 2014

GSXR Master Cylinder Recall, the Dealers and the Bull.

It was long overdue.
One thing you should know from the start - I can't abide anyone else working on my stuff. I will always try to do it myself. Working in car dealerships for over twenty years does that to you - you see a fair variation in workmanship. So the letter from Suzuki had been festering in my rucksack for six months but, then again, any corrosion present in my master cylinder could've been present for eight years now anyway (it is a K6). 

Any signs? Sponginess?
Nothing. On original hoses, the lever still felt as good as ever. Fluid is changed regularly, or at least while I've owned it. It's not a solid lever, but the brakes are still adequate for hauling the old girl up - and light years ahead of my sixty year old Beesa:) What more could you ask for?

Tuesday, February 7, 2012

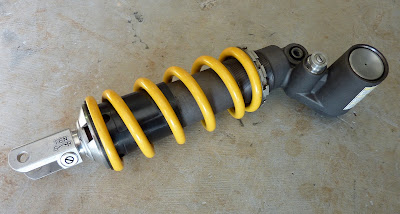
GSXR 1000 K5/K6 Suspension - Swingarm and Shock

Boing Boing Boing!


Although there wasn't much wrong with the rear of the bike, apart from the tired shock absorber, I wanted to replace any worn needle roller bearings in the swingarm and linkages. While the swingarm was out, I could also repaint it because of a few scratches.

With the bearings all ordered, replacement was pretty straightforward. I replaced the two main swingarm bearings too because I could feel the tiniest amount of play in there. This was exactly the same afterwards though, so I guess a tiny bit is normal.


Bearings were removed with hammer and punch when necessary, and using sockets with 12mm threaded bar. They were all pulled back in with the threaded bar, sockets and large washers. Here's the finished linkage.


Scratches were flatted out with 400 then 800 grit paper and etch primer applied to the bare aluminium. Next it was primed, and finally painted with satin black. It came out well considering the chain was still wrapped around it!


The shock, although in need of a freshen up, was going back in. Maybe a rebuild in the future.


A lack of pics doesn't help, but the job was relatively simple and the swingarm pivot tool is definitely needed to avoid damage to the swingarm spindle nut.

Monday, July 26, 2010

New chain and sprockets for the GSXR

It was time.  I'd been putting it off for a while and I was getting fed up with having to adjust the chain on the GSXR after every ride!  

New sprockets were ordered from www.bikegearwarehouse.com.au - the chain I already had waiting.


Vortex front sprocket, 17 tooth (standard)
Driven rear sprocket,  43 tooth (1 tooth more - K7 gearing)
DID Gold X-ring 530 chain.

I'm not changing the gearing too much, but this will give the K6 that slight extra snap in acceleration and the wheelbase is also reduced.  Wheelies should be easier than ever. After removing a few links from the chain, the adjusters are all the way forward. 


The black, stealth sprocket is looking good.  The hollow rivets in the chain link have mushroomed nicely with the rivet tool.  We are green for go.  Early morning ride coming up and hopefully no more of this constant adjusting!


Monday, January 11, 2010

The Great Split Link Debate. Safe?

Opinions are strong where split links are used in chains.
No problem on small bikes but a rivet link is mandatory on large, powerful, machines. Or is it?

The split link was the staple diet of classic British bikes; never a problem and, in fact, you would sometimes need to add a half link when altering sprocket sizes. But they were relatively low-powered and didn't require a permanent, riveted link. But modern bikes can be pushing out an extra 120 BHP, so you generally expect to see a fixed link in place on its 530 O-ring chain.

So when I bought my GSXR 1000 K6 from a dealer, and spotted the new back tyre and shiny, gold chain, I was happy in the knowledge I wasn't going to have to do anything to it. When I got it home I had a closer look and, to my initial horror, this was fitted! It's a 530 O-ring chain made by SFR, a company I've never heard of, but seems to be doing pretty well.


This was nine months ago. I bought a new DID X-ring chain soon after but still haven't fitted it. I just clean/grease the chain every three/four weeks and adjust it when necessary.
So far so good. It's almost become a contest to see how long it will last - actually I don't want to know - and I will change it, and the sprockets, when I see signs of excessive wear.
I'm not saying it's ok to use a split link on an out and out sports bike - but they may not be as bad you think.