And if you leave the rust to spread, the blues is what you'll be singing.
Takes me back to when I was 18 or 19, riding a '58 Triumph Speedtwin. My mate and I were on our way into Hereford, the traffic was backed up a bit from the roundabout and we were busy swerving our way through when he came alongside me, on his Stan Stephen's Stage-3 tuned, RD350 YPVS, to tell me that I had a water leak.
My initial response was "F#ck, where from?"
It dawned pretty quickly that there is no water in a pre-unit Triumph! The tank had split and petrol was absolutely pissing out all over the head and barrels! I killed the engine, which helped a little because the vibration stopped, and calmly pushed (very quickly) it over to the bike shop that used to be on that very roundabout. A mechanic there gave me a tray to put under it, and my mate gave me a lift back home where I borrowed a Transit from work to pick up the old Trumpet. Job's a fish.
But I digress, as usual, because we're now in Bandit country. One of the first things I noticed about the Bandit was the fuel gauge, and it didn't move as Suzuki intended. There was also rust visible in the tank.
A quick test of the fuel gauge goes as follows: unplug the tank sender unit, rear right of the petrol tank on the Bandit, and insert a wire into both terminals of the loom. This is basically returning 12v to the gauge (or mimicking a full tank). The gauge went to the full position so happy days. Time to pull out the tap and fuel sender.
All looks good underneath, everything in extremely good fettle. From here it is pretty self-explanatory — empty the tank of fuel, and remove tap and sender.
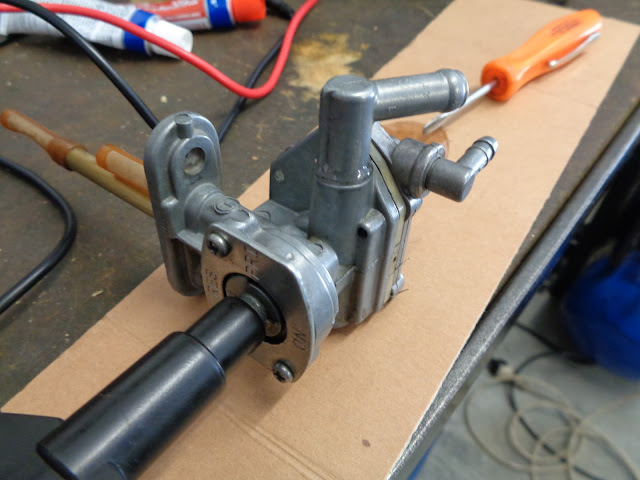
The black plastic extension was loose on the petrol tap, but a clean up of the thread with a tap and the fitting of a longer screw got that sorted. The fuel outlet was also slightly loose, more on that later.
So this is the sender unit. You'll need to unhook the thin steel plate that covers the coil of wire first, then the workings are visible.
Note the rust in the bottom of the unit. There is also corrosion on the windings, and the metal part that moves back and forth as the float goes up and down.
I cleaned it all up with scotch pad, and whatever else I could find that wasn't too harsh. It'll never be perfect, but as long as it's clean and remains immersed in fuel, should stay corrosion-free.
This will give you a better idea of how it works. The more coils of wire the current has to travel through will give a higher resistance. So if the float is at its lowest point (empty tank), the current will have to go through all the coils of wire before it goes to the gauge.
At its lowest position, you are looking for a reading of 103 - 117 ohms.
At its highest position, you want 1 - 5 ohms. The arm is adjustable by undoing a grub screw. It was easier to clean up all the contacts by undoing this and resetting it when finished.
This pic gives a better view of the windings and corrosion. As long as the main contact points are clean, it'll work.
Perfect, and well within range. That will ding dang do for me.
So the extension on the tap was loose and the screw would no longer hold. The thread was cleaned up with a 3mm tap (or was it 4mm? Not sure now...) and a longer screw used and all was well.
The outlet on the tap was loose too. It's a pretty common issue and they rarely leak but I wasn't keen.
I cleaned up the inside of the tap, and also the push fit adaptor. Then I mixed up some Araldite (two-pack epoxy resin), and applied a little around the adaptor.
I refitted it, turned it to the position I thought looked somewhere near and let it set. Seems good.
The last thing I did was to make a couple of plates up to seal the bottom of the tank. This way I could shake a handful of nuts, bolts and washers around inside to clean out some of the corrosion. With some diesel in the tank too, you can give it a really good shake around to loosen the rust and dirt.
After emptying the tank a couple of times, the fuel came out clean. With a quick flush of petrol, the tap and sender unit were refitted.
The gauge now works as Suzuki intended but, due to the grunt of that engine, drops down far faster than I'm happy with!
More coming...


Great walkthrough, will be using this advice shortly. Thanks
ReplyDeleteThank you and good luck!
Delete