Wednesday, November 27, 2013

6Sigma Racing - Rejet Kits.

Pod filters and open (ish) pipes.
It all leads to one thing, lean fuelling. It was all Dynojet kits when I was growing up. New pipes, or just a slip-on can? Needs up-jetting. And, although expensive when compared to buying a few jets, you knew your bike was going to run pretty well for the setup you had.
They did the testing for you to save you constantly removing a bank of carbs, swapping jets and then road testing it. That was enough of a selling point, and well worth the money, for most people.

Back to the point.
A little bit of searching online and I found 6Sigma racing jet kits for sale on eBay. Reasonable money, good feedback and they seemed to have a fair idea on what they were doing. Gotta be worth a shot so I put in a best offer, they accepted and the rest, as they say, is history.


Saturday, November 16, 2013

eBay Search Hits The Spot Again!

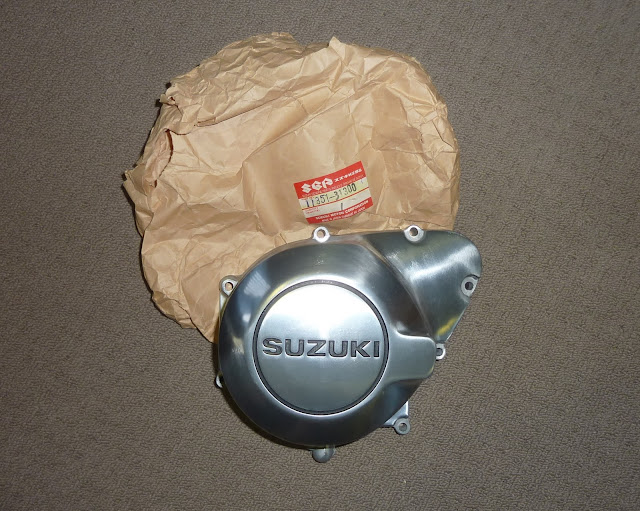
Search: 11351-31300

Bought a project? Do yourself a favour and make a list of the items you'll definitely need to finish it off. Go to an online parts website and use their microfiche facility to work out the exact part numbers you need and, finally, save your search on eBay.

As the months go by, it's surprising what pops up for sale. I've now picked up a new stator cover for the GSX. That's both front crankcase covers sorted now which is going to finish the engine off nicely.

A big thanks to mcpartssales for packing and sending it so quickly. Great service and proof that those hard to find bits are still hidden away in shops everywhere. If you're looking for anything for your project, give Rod a shout at his eBay store. He's been in the bike trade for over thirty years and is absolutely passionate about finding the elusive bits we all need every now and again. Thanks again mate!


Wednesday, November 13, 2013

Anti-Dive Fork Technology - Or Not?

Improved Suspension Means Faster Bikes!
In a time when power and performance were paramount, the superbike manufacturers of the seventies and eighties were busying themselves with update after update. The big four Japanese factories continually pushing themselves to bring out the biggest and, perhaps more importantly, fastest bikes to sell to an eager public. The fact that the frames couldn't hold most of them in a straight line didn't matter, horsepower sold bikes. Besides, when you're in the pub claiming 80BHP at the back wheel over a few pints, the fact that you encountered death regularly really didn't matter (hell, it probably added to the bragging rights). 

But as the engines continued to grow, somebody in Japan must have twigged that a bike that went in a straight line of its own accord, and round corners at the pilot's, might be a useful design brief. And it worked. Suspension improved, frames got stiffer, and gimmicky names and four-letter abbreviations began to take off!

1) Full Floater suspension - Suzuki's mono shock system.
2) TSCC - Twin Swirl Combustion Chambers (pretty cool huh?)
3) SADS - Suzuki Anti Dive System (or maybe just stick with sad)

All of the factories were at it, and all trying to outplay the other. I guess it kept them honest, and the punter was happy to benefit from the very latest in sports bike technology. And some of it was good; gear selection indicators must have been light years ahead at the time, and I'm glad to see Suzuki still using them (I wouldn't be without it now). But for every good idea, there came the oddities.

Consider, if you will, a device to prevent the forks from diving when applying the brakes. Imagine, suspension unflustered, steering geometry remaining a constant when cornering, what could possibly go wrong? Hmm, what about bumps in the road? 
Unless a [relief] valve was incorporated in the forks, you were now riding with a rigid front end - until you released the brakes. Upon which the suspension would suddenly start moving again, affecting the entire bike's poise. Not really that good when you're committed to a bend. But, SADS does have such a valve incorporated, so maybe all is not lost.
The next aspect to think about is brake lever travel. Single piston, floating calipers have one major drawback. Once the piston has moved its brake pad into contact with one side of the disc, the caliper itself must slide to enable the other brake pad to do the same. Although the movement should only be slight, it does increase lever travel. Factor in the anti-dive mechanism and it's going to be hard to get good feel from the lever. Maybe a late Gixer master cylinder will help...

Anyway, without further ado, we have the anti-dive modulators themselves. Here's how it's ripped apart, cleaned up and put back together.

Monday, October 28, 2013

Lowering Conventional Forks - The Art Of Height Reduction.

I'll be honest... I looked up how to do this on the internet, and what a simple idea!

One pair of standard length, conventional forks.


Here's why.
The GSX750ES has a clip-on style handlebar with one major issue - it's mounted above the top yoke/triple clamp. If you're going to lose this awful looking tiller, you're left with about 30mm of stanchion stuck above the yoke. This, in itself, looks crap. I've seen lowered cafe racers with that done to them, but it's not really the look I want.
So I need to shorten the forks themselves. Now apparently you can get shortened stanchions from someone in the States, but that'll no doubt prove expensive and probably come with its own set of problems. But by fitting a spacer inside the forks themselves, you can actually reduce the working range of the forks. You'll need to cut the main spring too, but then the fork can be dropped through the clamps, maintaining the bike's original height if need be, and cleaning up the top yoke area.

Here's how.
First, strip the forks. Make a start by slackening the top nut/preload adjuster. I used an airgun to cheat/make it easy. If you're taking them out of the bike first, slacken the top clamps only, and use a tight fitting socket to undo the nut. The lower clamp will prevent the fork from turning.


I then removed the four bolts holding the anti-dive unit on to the bottom of the fork leg. That way I can drain all the oil quickly - strewth, what a state! These forks haven't seen a service in years, maybe never.


This is the back of the ant-dive unit. That'll be stripped, cleaned and checked in another post.


With the dust cover already removed, the circlip is now visible above the washer and oil seal. A right-angled circlip pliers makes this job easy. It's corroded and takes a bit of moving to free up.


The next job is to remove the bottom bolt holding the damper assembly into the bottom of the fork leg. Again I'm cheating. Usually a tool is needed to prevent the damper spinning inside the stanchion while unscrewing the bolt. If you use an airgun, it will normally whip it out before the damper has chance to turn. Happy days.


Next I grab the stanchion and pull it up hard against the seal. It takes a few smacks, but eventually pops up through with the top bush. The seal is now easily removed to reveal the carnage inside. Man, this oil is crappy!


Oil with this amount of metal suspended in it just wears the internals away. Changing it regularly prevents wear, and gives a much better ride.


The damper assembly pulls apart and the rod and top-out spring are removed through the top of the stanchion. Now it's time to degrease every component.


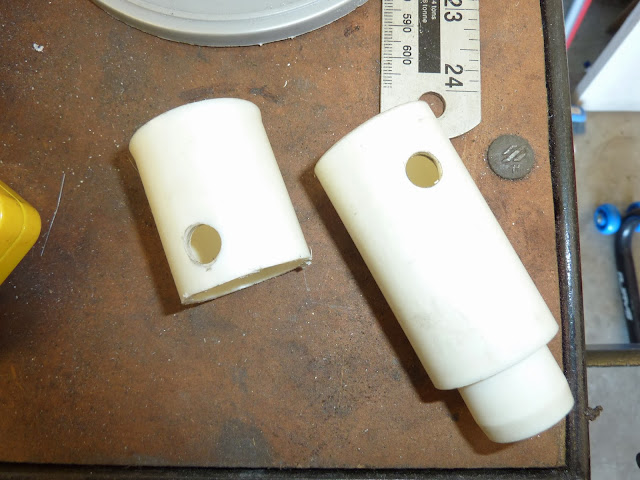
This is the damper rod and top-out spring, and this is what I'm altering. Simply placing a spacer above the spring prevents the fork from extending fully, and fork height is reduced. As luck would have it, a piece removed from the frame is a perfect fit on the tube. I cut a couple of pieces just slightly short of the oil bleed holes (don't want to block those). 
Damn, I miss having a lathe sometimes - hacksaw and file it is then.


And that's it!
Reassembly will commence when the sliders have been painted, and I've acquired new stanchions. Watch this space.

Friday, October 11, 2013

Traxxion Dynamics' Linear Rate Springs - GSXR1000

Curing the K6 thou's bumpy bits.
Previous posts dealt with the suspension upgrades on the trusty '06 Gixer. The shock was re-shimmed, serviced and fitted with a linear rate spring. No problems there (with my limited ability at least). The 43mm Kayabas were re-shimmed and filled with fresh oil but, due to funding, came back with the standard 0.95kg progressive springs.
As the months progressed, they started to leak oil and preload adjusters were screwed right in to try and prevent bottoming out. The front was getting very harsh to say the least. Put up against modern bikes and she was beginning to show her age. Smooth roads were fine, but the bumpy stuff was iffy, sometimes scary.

SO...
A couple of emails to Traxxion Dynamics and they sorted me out with their straight-rate springs with an overall rating of 0.975kg. I just had to choose the fitting method for the type of spring - either cut the spacer, or alter the top-out springs within the cartridge. I decided to leave the cartridges alone and just cut the spacer.


Forks were stripped as per, leaving cartridges in place, then the old seals were taken out and plenty of brake cleaner inside the outer fork tubes to remove the dirty residue. Photos are limited unfortunately - I got carried away with the job and forgot to take enough of them!


Spring compressed ready for the fork top to be removed from the damper rod assembly.


New springs, note the extra length.


Traxxion provide all the instructions on how to measure the amount to be cut away, but they'd already given me the nod that 40mm was the way forward for the Gixer. The picture below shows the 40mm cut off the spacer (left), and new holes drilled in what's left for the spring compressor.


With new oil seals fitted, it was time to refill with oil and put them both back together. I'm running with the Suzuki standard air gap of 101mm. 
(Both forks were leaking, and when I stripped them they had an air gap of 140mm - no wonder they were getting harsh!)
I slipped the forks back into the clamps and refitted the mudguard, wheel and calipers. I only tighten the lower triple clamp bolts once the wheel is in and the suspension bounced up and down a few times. This relieves any tension/twist when fitting the wheel etc. 

Road test time.
I think we're onto something here. I basically just set my compression damping at ten clicks out, rebound at seven clicks and the preload to the first line on the adjusters. 


A blast along some of my favourite roads and I've still got an inch of travel in reserve! What a difference. It feels so much more stable in the bends now which could be as much do with oil level as well as the different geometry. I'll experiment with less compression damping to see if I can get a softer/more plush ride next.


Overall, I'm happy as. No leaks (for now), and the bike's actually easier to ride. A highly recommended mod. If you're not using a zip tie on your stanchions, go get one now. That little plastic tie is a mine of information!

Saturday, August 24, 2013

Straightening Bent Levers.

So you dropped the bike?
And the levers took the hit. Well, as long as they aren't snapped clean off, you might be able to save them. 
I'm concentrating on aluminium brake, clutch and gear levers for this post (I'll mention steel at the end).

Aluminium (Al) is light, corrosion-resistant, and can easily be cut, drilled, machined, polished etc. It can also be worked (bent or shaped) relatively easily if you treat it the right way. But it will work-harden, which means the more you bend it, the harder, and more prone to cracking, it becomes. Hence why they normally snap in a spill.

Why can't I just bend it back?
Hey, you might be lucky. A slight bend may go back easily enough, but I don't recommend trying it without annealing the part first. And it's such a simple process, you'll be glad you spent the time doing it properly.

Tools
1) Blow lamp
2) Soap, yes really.

If you've ever needed to bend steel, using heat, you'll know it needs to be cherry-red to allow it to move easily. But you don't have that luxury with aluminium; it won't change colour, and excessive heat will just melt it (660.3˚C). Which is where the soap comes in... so, without further ado.

Tuesday, August 13, 2013

Bridgestone S20 (Quick) Review

Bigger is better!
So the 190/50 is apparently now old fashioned? Strange times indeed. The lower the profile the better back in the day, but now a taller, rounder tyre is the preferred choice - to give more sidewall grip if you will. 
Fair call. The more grip the better; no one would disagree there.
So, with the second set of Rosso II's completely knackered (the Gixer was becoming hard work to ride fast), I perused eBay for the cheapest pair of decent 190/55 120/70 tyres I could find. Chaparral Motor Sports in the States came up trumps, AU$360, delivered, for the new Bridgestone S20's! Happy days, let's get them bought.


Cracking service.
They arrived in just over a week, so Saturday morning was spent stripping the old tyres, cleaning away the slight corrosion on the inside of the rims and slapping the new ones on. Balancing was carried out on the static rig I knocked up before, and soon they were ready to go back in the bike.

Whoop, time to play. 
Lucky enough to live on a mountain, most of the roads I travel involve bends, and plenty of them. So off I go, and after a few turns I start to think I've made a huge mistake. New tyres always feel strange (our bodies have an incredible ability to adapt to the worn-out rubbish we've just taken off), but this was weird!
It wanted to fall nicely into the bends, but there was a nasty weave while leant over. Oops. After reading about the benefits of the 190/55 on a K5/6 Gixer, I was a little worried about what I was feeling. But a couple of k's in and the, let's face it, amazing human body started to relax and let the bike do what it needed to do. And then it started to click. 


Bridgestone S20 190/55R17
Relax, don't do it... 
It's the only way to ride. Mellow out, loose hands, let the bike do its thing and help it out by moving your body position to suit. I started to enjoy the new profile. Even with the front forks suffering (leaky seals, original springs), the difference in handling was stunning! The more k's the better it got. 
The Bridgestones are typically soft, just take a look at the bits of rubber all over the tyre after a ride. Good enough to convince you that you're quick through the bends. Hmm, same pace on a Michelin will sort that nonsense out. But I like them! This bike has taken on a new lease of life. I even gave it a much needed wash!


Are there any bad tyres nowadays?
Probably not, I've tried to follow an old giffer on a Blackbird, shod with Shinkos, and could barely hold onto him! This (almost) pensioner is fast as bastard fu#*, goes out with no gloves, a pair of jeans and an old Goretex type jacket and this old boy could quite easily do half hour in ten minutes. On Shinkos! 'Twas an eye opener the first time I tried it on.
So while these S20's feel absolutely superb, it's hard to say whether or not the major change is because of the aspect ratio, or the tyre manufacturer. All I know is I'll be sticking to this size (although a lad who rides locally swears by the 200/55 on the same bike).

190/55R17 Bridgestone S20R

Chicken strips
Vanity huh? It'll take a while to get to the edge of these, and I'll be going even slower than normal to get there! Call it the safety aspect - always something in reserve to save your ass when all goes wrong. Or maybe it's time to attempt elbow down on the road?


The S20 is a good looking tyre.
As strange as that sounds, it matters a lot. I love the look of them and the feel. It's early days yet, but so far they've made one of the biggest improvements to my bike. If you've been wondering about the upgrade to a 55, give it a whirl, I don't think you'll be disappointed.

Conclusion?
Bloody brilliant. A lot of people moan that Bridgestones feel crap once worn but, in fairness, I think all tyres feel crap when worn. For now, the pizzazz is back in this Gixer, and that's all that really matters to me. I'm running 36psi front and rear at the moment, in coolish weather, and it feels perfect.


"Kneedown? Need bloody elbow sliders me!" Two Wheels Magazine.

Also...
I've got linear rate, 0.975kg springs coming from Traxxion Dynamics soon. Expect a full run through of the fitment, and how it feels on the road. No more bottoming out I hope! Stay posted.