Saturday, May 20, 2023

RAD Hard Chroming - A BIG Shout out!

Quality...

It's sad, but in the thirty-something years I've been involved in the motor trade, I've seen a huge decline in the pride that a tradesman took in his work. What happened to "If a job's worth doing, it's worth doing right"?

But recently I came across a proper old-school business that restores faith in the ability to repair something properly. 

RAD Hard Chroming.

The Yamaha FZ750 forks were far too pitted to reuse as they were, so I needed them re-chromed. A quick look on Google, and then on various bike forums, was all I needed to see that RAD Hard Chroming were the guys for the job. 

After a quick email for a quote, I had them dropped off at the Brisbane business, and I waited.

They were just too far gone.

Tuesday, May 16, 2023

Yamaha FZ750 Restoration - Suspenders and Fast Rides.

Cracking blast today!

I'll digress at the start of the blog today. I'm having a great day! We all met up early for a fastish blast this morning and the 2002 R1 got to pit itself against a much-too-loud 2014 S1000RR (running 196BHP at the wheel). We also had a ZX14R, Diavel, CBR600RR, CBF13000, and an MT-07. She, the R1, limped home on three cylinders in the end but really did herself proud. 

Sunday, April 16, 2023

Yamaha FZ750 Restoration - The Shock Absorber


 Originality...

The original shock on the FZ, as could be expected, was well and truly past its sell-by date. I would have loved to use the original but I also want this bike to handle as well as possible without the costs associated with Ohlins etc. 


Finding another original shock in good condition has been challenging so far but you never know what might turn up one day. So, to allow me to carry on reassembling, I again spoke to Paulo at Motogenn and bought one from a low-kilometre 2018 Ducati Monster 821. This one was chosen as it is the same length so hopefully not too many alterations needed. It's made by Sachs and should be far superior to the original anyway, not to mention lighter.

It looks absolutely mint, and now requires a slight rejig to fit the original mountings of the FZ. No easy task as the shock has rose joints to suit an M10 bolt, whereas the FZ has an 18mm pivot pin running through the lower mount. The top mount is an M12 bolt but, with spacers in the top rose joint removed, the FZ bolt is a perfect fit. It just needs some spacers to maintain its central position.

I pressed out the lower bush in the vice, and started measuring.

The bushes in the original FZ shock appear to be Teflon-coated, like fork bushes, so I made a puller to remove them for inspection. They look great so I will make a steel bush to fit the lower shock eye, fit the bushes inside and finish it off with some spacers to keep the shock central and prevent any wear occurring against the aluminium bracket that the shock is mounted to. 

This is the steel bush that will go through the bottom of the shock. The original bushes will be pressed inside. I'll probably fit a grease nipple to the pivot pin so I can grease the bearings to keep dirt outside. More on that later.

The bushes were drawn in using the puller I made earlier and worked a treat. I also made end caps to fully support the thin bush when the pivot shaft is fitted. These will also prevent any wear to the aluminium bracket.

There is the new main shock bush with Teflon bushes inside. Those are the two end caps to keep everything central.


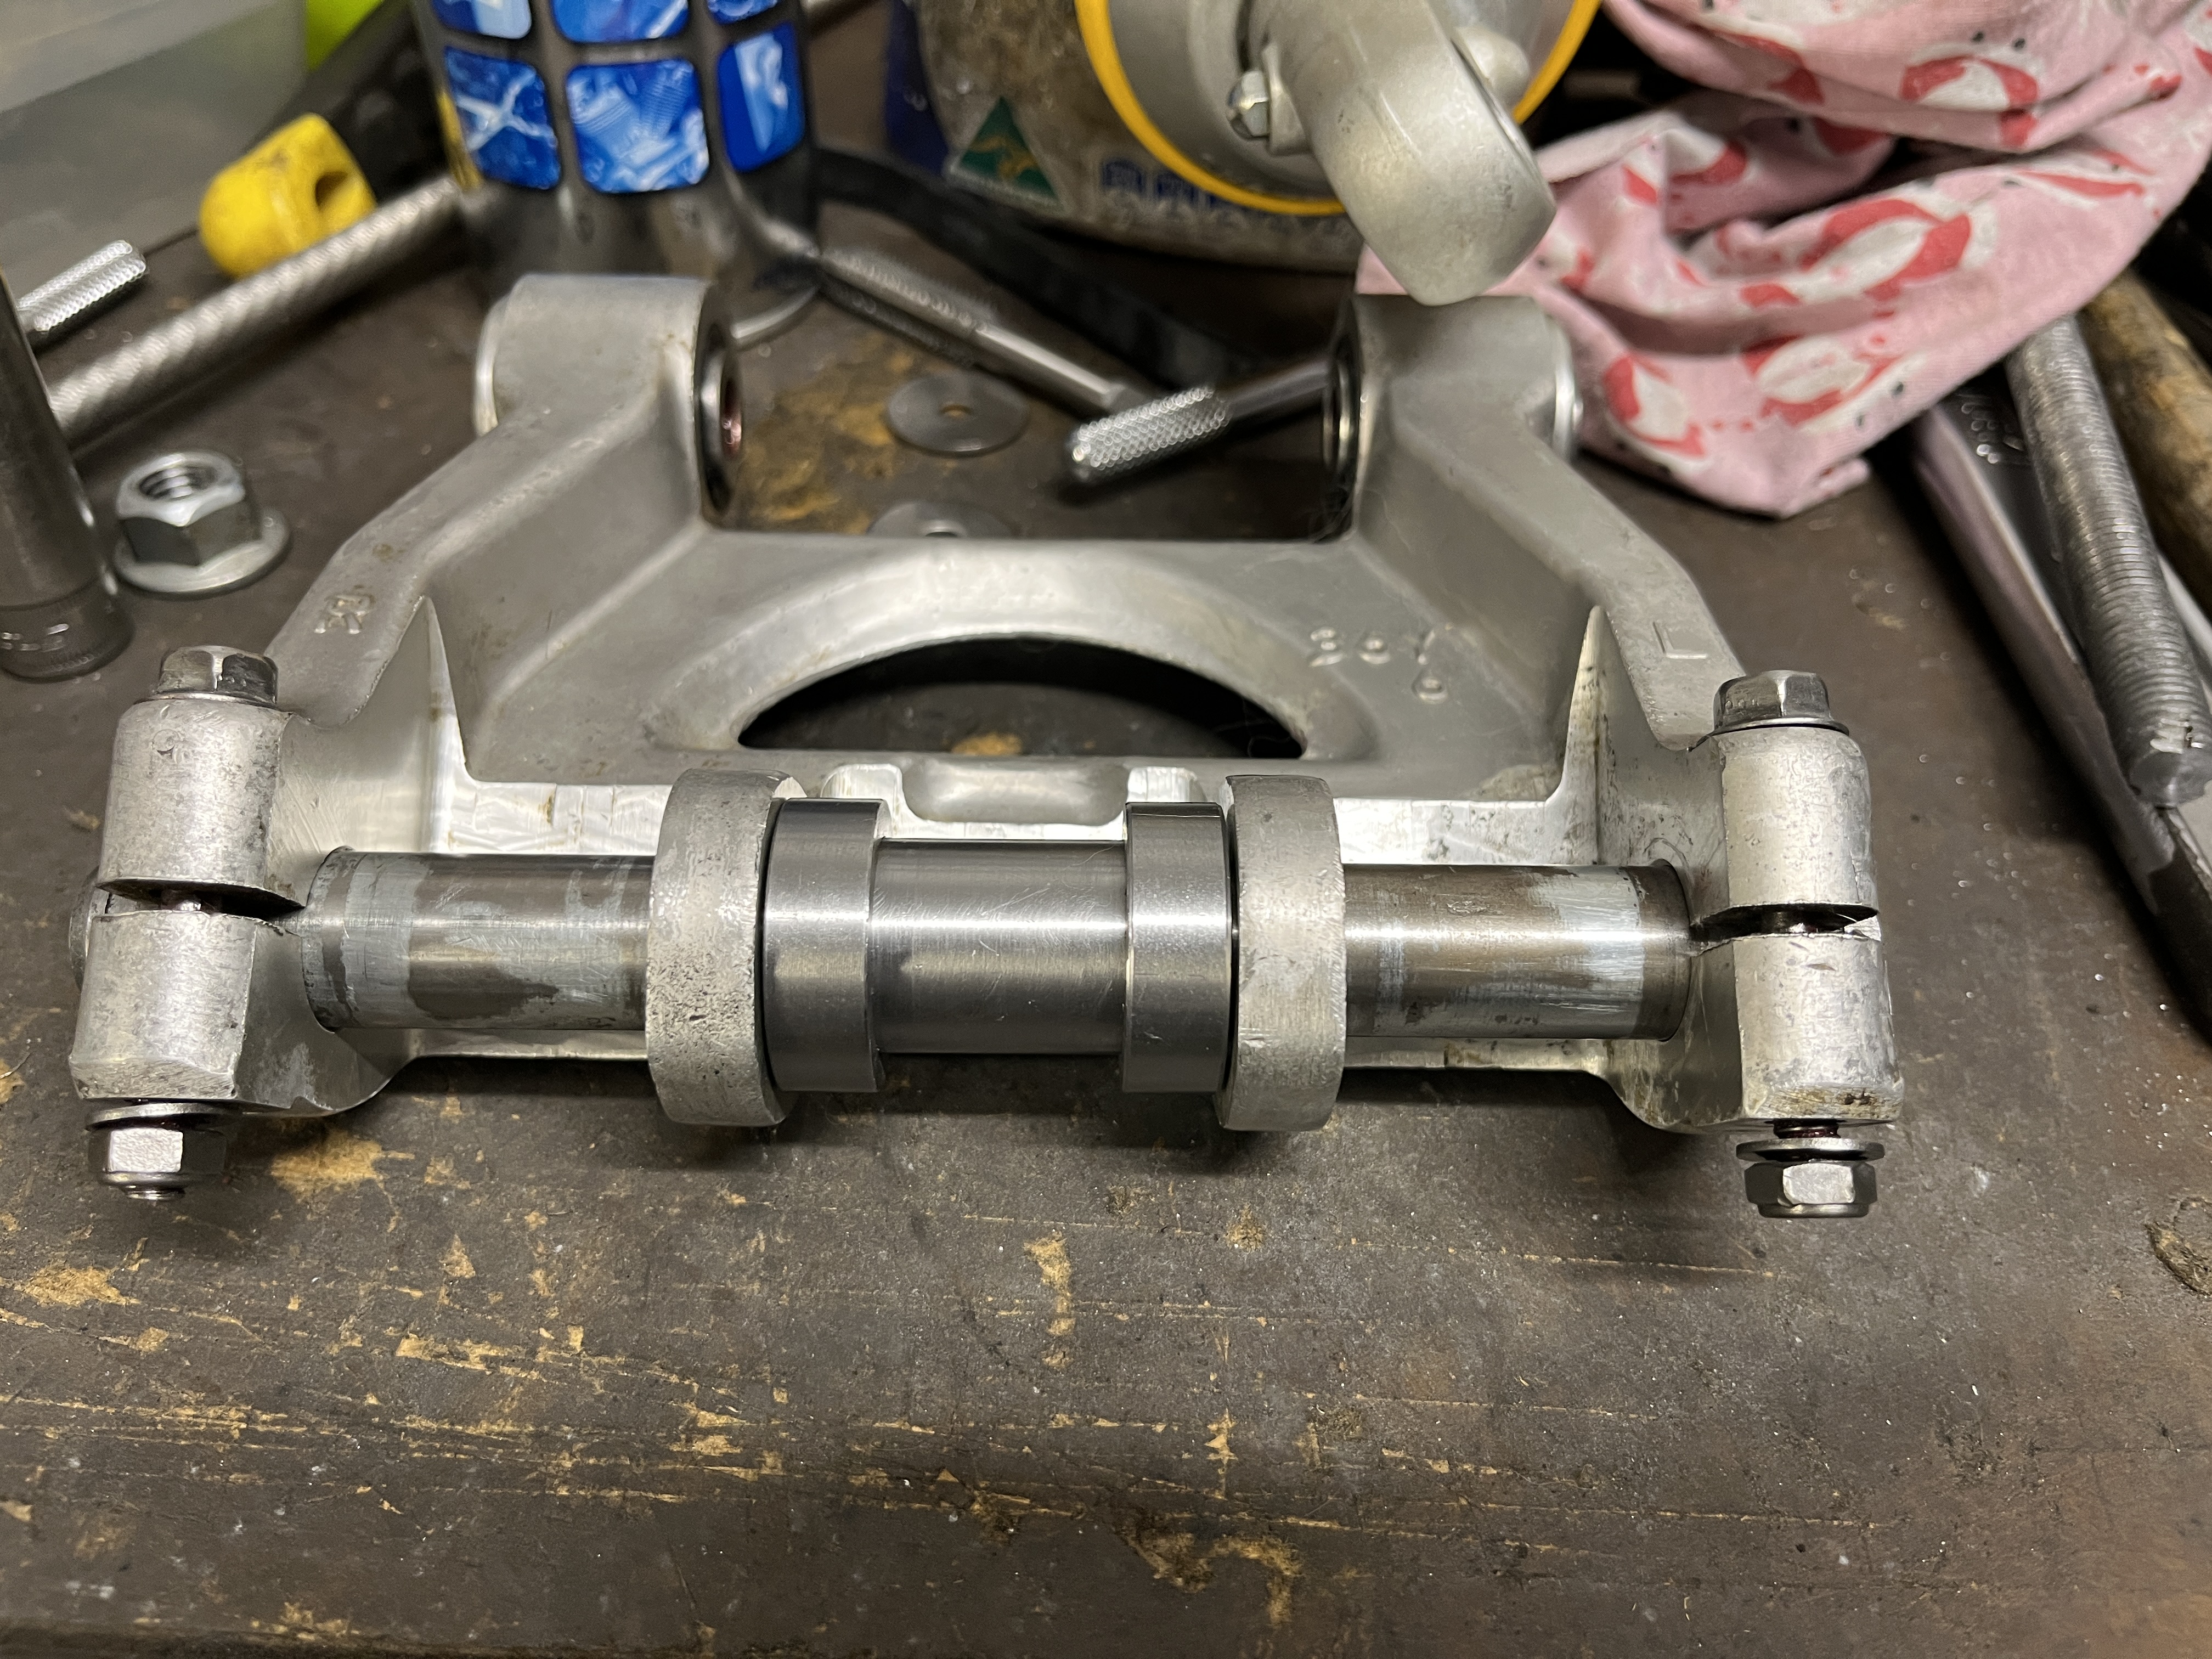
This is how it will fit inside the monoshock bracket under the swingarm. The pivot pin slides through and has a circlip fitted for safety. The two M6 clamping bolts prevent any movement.


And finally with shock mounted. The Teflon bushes are smeared with a light Lithium grease when assembled. I was going to add a grease nipple to the end of the pivot and drill three small holes along it to grease the bearings when I wanted to, but the shaft is hardened, as expected, so I will leave it alone. 


That's the puller for removing and refitting the bushes with no damage whatsoever. Worked perfectly.


Ok, will post more when the swingarm is mounted.

Friday, April 14, 2023

KTM Superduke 990R - New Tyres and Sprocket Carrier Bearings


Four years too late...

The old Superduke of Bridgey's has been somewhat neglected lately. And when I say lately, just the last four years or so. It's still pretty clean, don't get me wrong, but legend has it Boudicea was using the same tyres on her chariots. 

Now I wouldn't have bothered putting up this post for a pair of new Pirelli Rosso II's but, what was concerning, was the state of the sprocket carrier bearings. Well, one in particular.

The Superduke has some great engineering plusses, one of which is the two bearings fitted to the sprocket carrier. Four bearings in all to let the wheel spin in the manner to which it's become accustomed. Imagine the rigidity, the ability to keep that wheel inline no matter what angles it's trying to put down the power.

As much as I like to take the piss, it's a bloody good idea.

But during a routine tyre change, it became obvious that all was not well in the bearing department, and the sprocket carrier was extremely notchy. The two spacers that go in from both sides were rusty and I wondered if the water had been held in there and got past the seals.

The two spacers on the piece of wood need to be knocked out first. Then the bearings can be hit out, one from each side taking note of the small spacer in between.

A closer look at the bearings with seals removed showed the carnage. The cage had broken up and it came to a premature end. The cause? Possibly overtightened chain at some stage.


After a good clean-up, two new bearings were fitted and everything was good again. A good reminder to always turn the bearings by hand whenever you take the wheels out, any notchiness and it's time for replacement. 

If you're very careful when removing the seals with a pick, you may be able to clean them out and regrease them, as long as they are smooth and quiet, but for the cost of new bearings, it is advisable to replace them when in doubt.

Anyway, it's certainly nice to see the old girl back out and fighting fit.


Sunday, February 26, 2023

Yamaha FZ750 Restoration - Clip-ons (handlebars)


 I got a bent one!

So the left clip-on has taken a bruising at some stage, not to mention the rust. I initially thought it might be able to be straightened but it had flattened the tube where it was bent and would never be right however much you looked at it. Secondhand ones are few and far between, and expensive, and I didn't want to risk getting another bent one.

On closer inspection of the offending item, you can see where they are originally welded to the cast clamp. With a bit of careful drilling and jiggery-pokery, we should be able to get the old steel tube off the clamp itself. It was pretty solid but gave way in the end. 

I cut off the bad section and placed what was left in the lathe to take the outer diameter down enough to remove the threaded section that holds the bar end weights. Eureka!

All that was left to do was to go to the steel shop and pick up a length of 22mm pipe with a 2mm wall thickness. Pretty common, one would hope. Not in Australia it would seem, it's no longer available.

I then ordered some "Pipe Furniture" sections which were supposed to be 22mm O.D., but even they turned out to be 21mm. Bridgey pointed out the old handlebars on the ZXR project bike (more on that later) and it gave me an idea. A set of straight drag bars should give me the dimensions I needed. Then I remembered a load of factory-seconds bars I bought and stored a while ago. I already had the correct material in stock!

So this is how it looked. The end is pitted with rust because Yamaha didn't paint them right to the end. For obvious reasons on the throttle side, I guess, and then they just wanted them to look the same.

Friday, January 27, 2023

Yamaha FZ750 Restoration - Burleigh Powder Coating.

The Frame is Back!

True to their word, less than a fortnight later and I got the call that it was ready to pick up. I was slightly apprehensive due to the fact that the rust was pretty bad, with heavy pitting. When you don't get to see what's left after blasting, it's always a worry. It's not cheap either. 

Would I have been better off with a wire brush in a drill and using aerosols? 😟 That would have taken forever as it's a big, complex frame. And the results are never the same when spraying a frame, overspray always dulling one side etc.

The powder coating on the BSA frame is still superb after thirty years, so I'd pretty much made my choice.

First, a wee recap. She was looking a little worse for wear...


The photos actually make it look far better than it was. Brake fluid had taken paint off in some places, rust had started taking over everywhere else. The centre stand looked like it had been dragged up from the Titanic.

Monday, January 23, 2023

The Yamaha FZ750 Restoration.

Blown away...

Carlsberg don't do projects, but if they did, they'd probably be the best projects in the world. Quite frankly, if a restoration project could be ideal, this one could well be it. Admittedly, the plastics are a bit rough, but mechanically she's proving to be pretty good.

After getting the engine running, the bike was quickly stripped and put into boxes. From here I will take pics, and start on individual components. If I get a bit fed up with doing one thing for too long, I'll move on to something else to break up the monotony. It's easy to get overwhelmed when stuck on a time-consuming part.

Anyone who has pulled old machines apart would be familiar with stripped heads on screws and bolts, especially when some of the bike is as rusty as this one. But, as corroded as every fastener is, everything came apart like it was put together last week! It's been surreal.

I had noticed play in the front wheel during the strip-down and was pretty shocked to find this.